Project Overview
Objective
To deploy a static CV website on AWS using:
- Amazon S3: For storage of static website files
- CloudFront: Content Delivery Network (CDN) with HTTPS
- Route 53: DNS management for the domain
- ACM: Amazon Certificate Manager for SSL certificates
Why This Project?
- Learn core AWS services for web hosting
- Improve website performance and security
- Create a professional cloud project for my portfolio
- Understand end-to-end static website deployment
Architecture Diagram
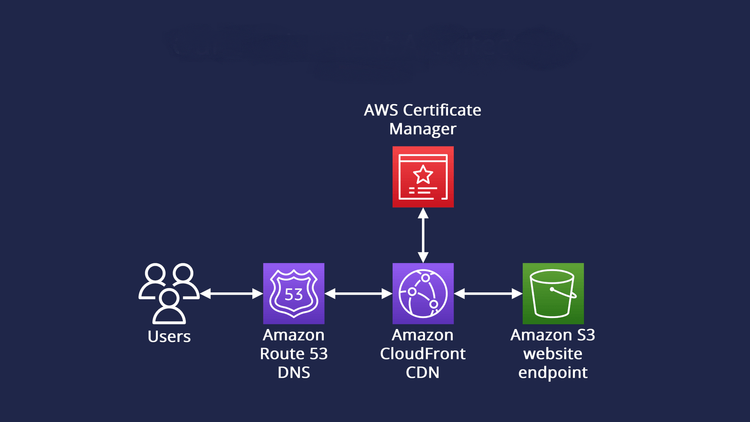
Architecture showing S3, CloudFront, Route 53, and ACM integration
About Route 53 Hosted Zones
A Hosted Zone in Route 53 is a container for DNS records that define how traffic is routed for a specific domain. There are two types:
- Public Hosted Zone: Routes internet traffic to your resources
- Private Hosted Zone: Routes traffic within your VPCs
In this project, we created a public hosted zone for our domain buildcloudwithanwer.co.uk.
About DNS Records
DNS records in Route 53 tell the internet how to handle requests for your domain. Key record types:
| Record Type |
Purpose |
Example |
| A |
Maps a hostname to an IPv4 address |
example.com → 192.0.2.1 |
| AAAA |
Maps a hostname to an IPv6 address |
example.com → 2001:0db8:85a3::8a2e:0370:7334 |
| CNAME |
Maps a hostname to another hostname |
www.example.com → example.com |
| Alias |
AWS-specific record that maps to AWS resources |
example.com → CloudFront distribution |
| NS |
Nameserver records for your hosted zone |
Delegates domain to Route 53 nameservers |
Step-by-Step Implementation
Step 1: Domain Registration & Route 53 Setup
View Detailed Steps
Why Route 53?
- Provides reliable DNS management
- Needed to link buildcloudwithanwer.co.uk to AWS resources
- Supports health checking and failover
Steps Performed:
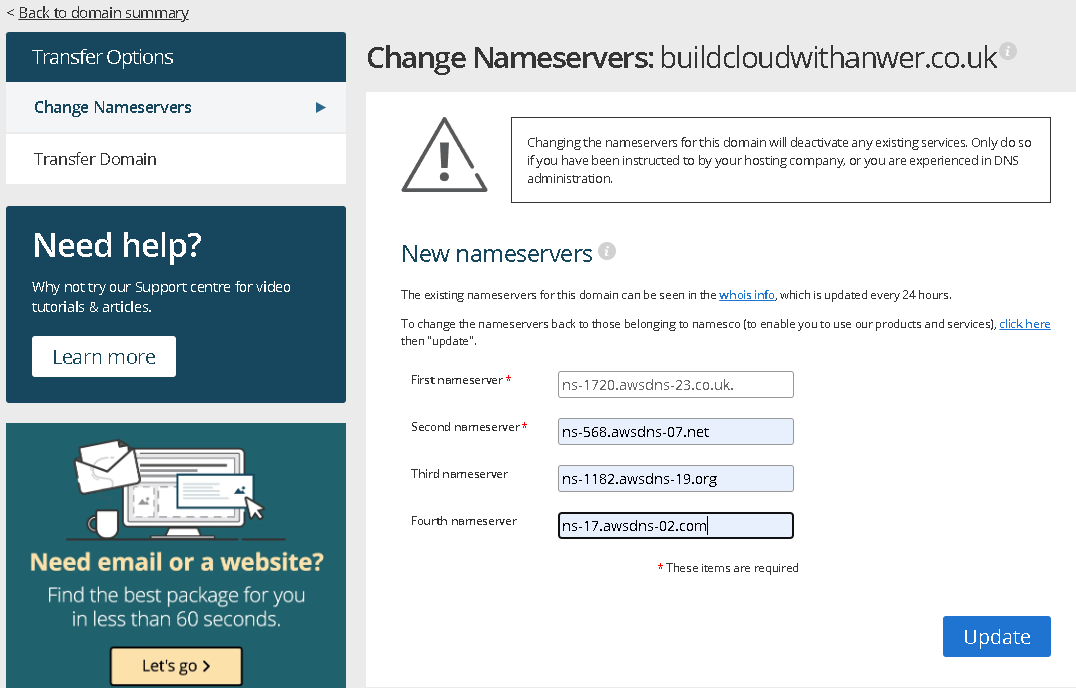
- Registered domain (buildcloudwithanwer.co.uk) via Names.co.uk
- Created a Hosted Zone in Route 53
- Updated nameservers at registrar (names.co.uk) to AWS NS records:
ns-1720.awsdns-23.co.uk
ns-568.awsdns-07.net
ns-1182.awsdns-19.org
ns-17.awsdns-02.com
- Waited for DNS propagation (took about 12 hours)
Screenshots:

Step 2: S3 Bucket Configuration
View Detailed Steps
Why Amazon S3?
- Cost-effective storage for static files
- No servers to manage
- High durability and availability
- Built-in static website hosting capability
Steps Performed:
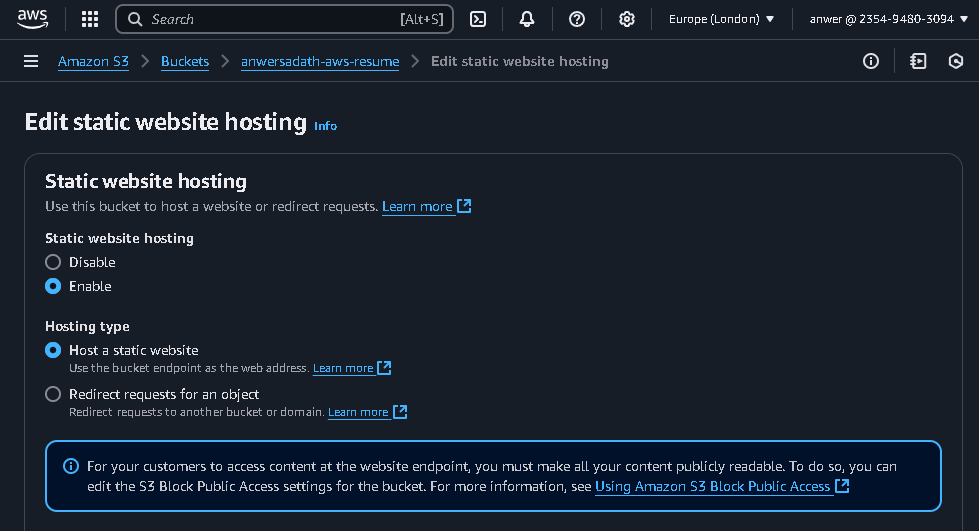
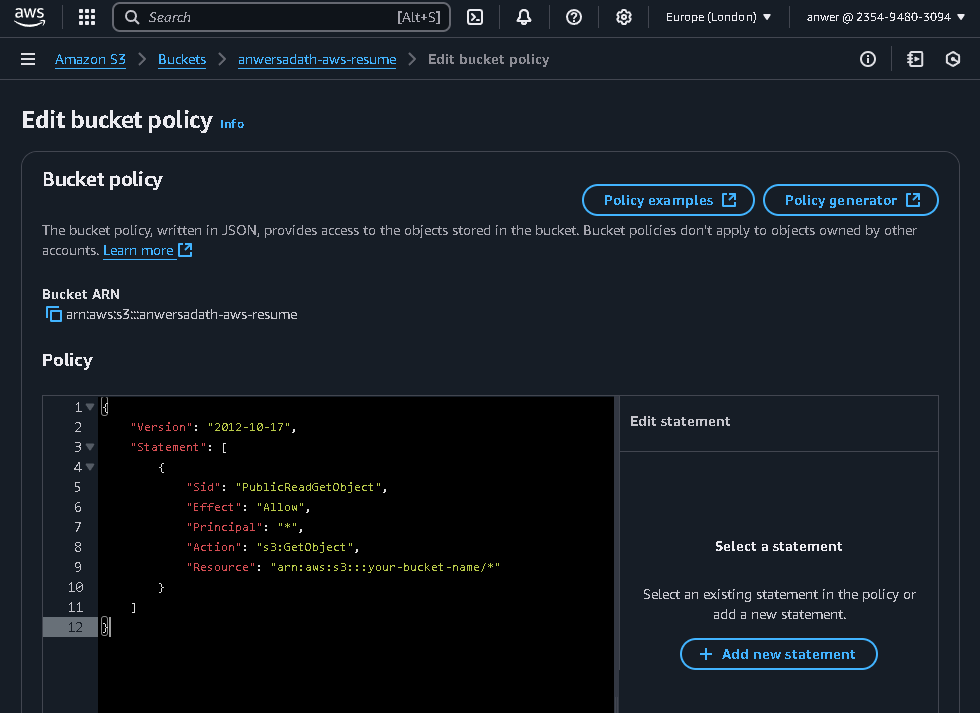
- Created bucket named buildcloudwithanwer.co.uk
- Enabled static website hosting (Index document: index.html)
- Set bucket policy for public access:
{
  "Version": "2012-10-17",
  "Statement": [{
    "Effect": "Allow",
    "Principal": "*",
    "Action": "s3:GetObject",
    "Resource": "arn:aws:s3:::buildcloudwithanwer.co.uk/*"
  }]
}
- Uploaded CV files (index.html, assets)
Screenshots:

Step 3: CloudFront Distribution
View Detailed Steps
Why CloudFront?
- Global CDN for faster loading worldwide
- Free HTTPS via AWS ACM
- DDoS protection
- Edge locations improve performance
Steps Performed:
- Created distribution with S3 as origin
- Configured alternate domain name: cv.buildcloudwithanwer.co.uk
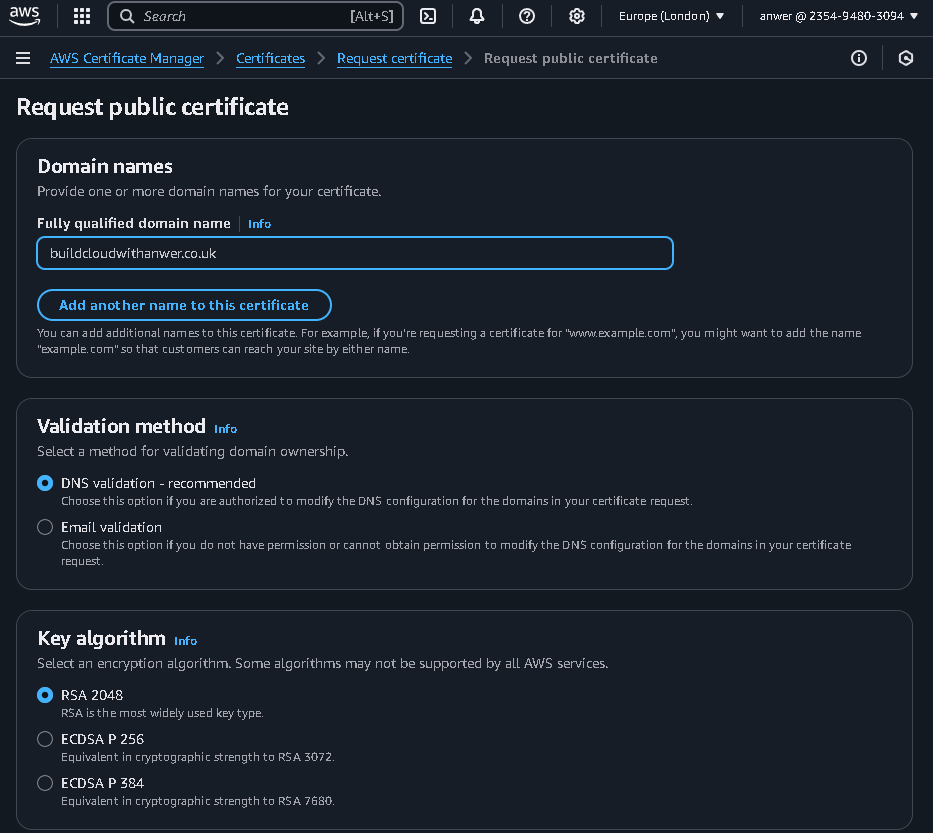
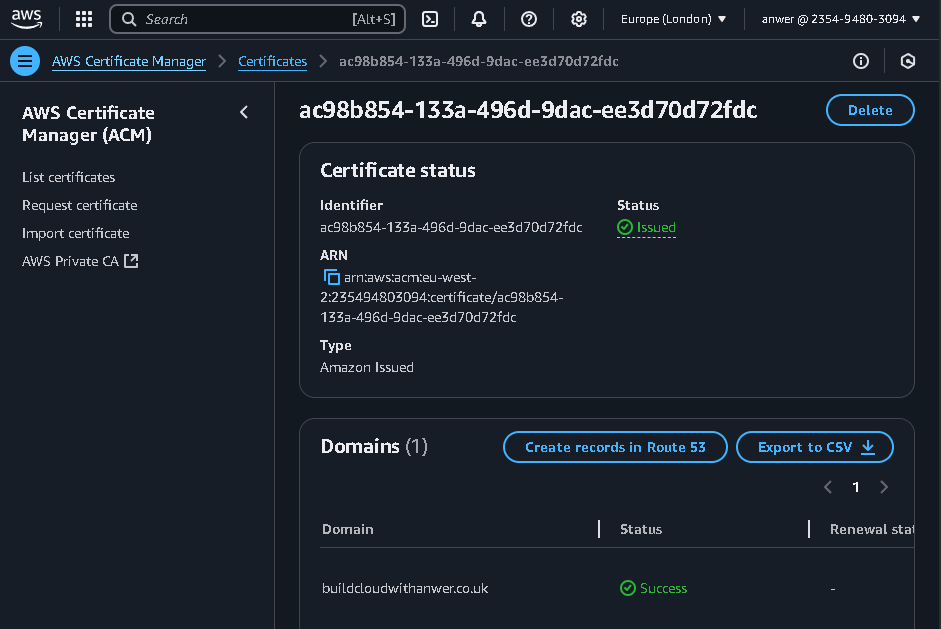
- Requested SSL Certificate via AWS ACM (free)
- Key settings:
- Default root object: index.html
- Protocol: Redirect HTTP → HTTPS
- Caching: Optimized for static content
- Price class: Use all edge locations
Screenshots:
Step 4: Route 53 DNS Records
View Detailed Steps
Why DNS Configuration?
- To route traffic from domain to CloudFront
- To enable custom domain with HTTPS
- To manage subdomains effectively
Steps Performed:
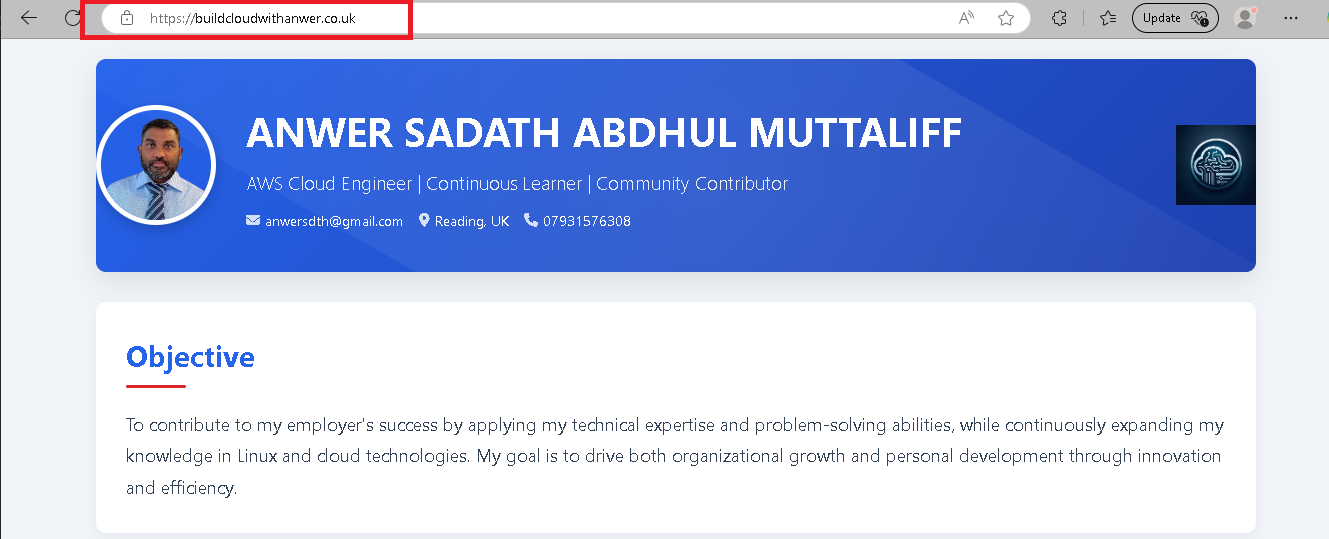
- Created A record for cv.buildcloudwithanwer.co.uk
- Configured Alias target to point to CloudFront distribution
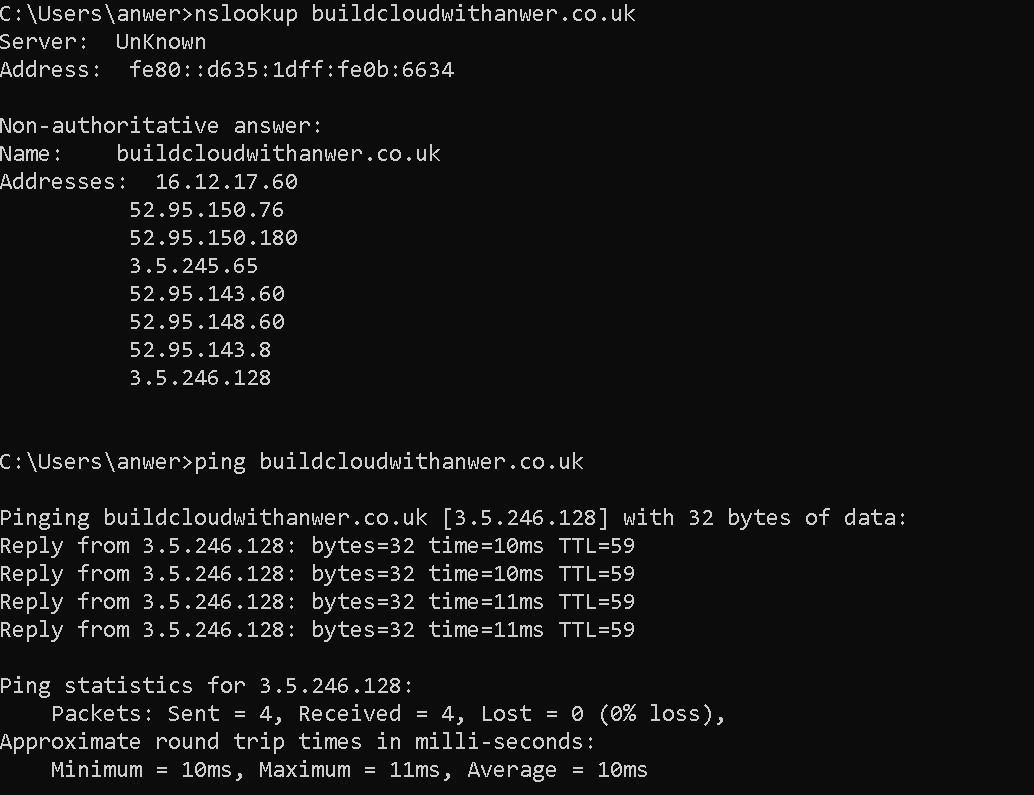
- Verified SSL (takes ~30 minutes)
- Tested HTTPS connection
Screenshots:
Performance Optimization
- CloudFront Caching: Set TTL (Time-To-Live) to 1 day for static assets to reduce origin requests to S3
- Compression: Enabled Brotli/Gzip compression in CloudFront for smaller file sizes
- HTTP/2: Used by default in CloudFront for faster parallel loads
- Edge Locations: Content served from nearest location to user
Cost Optimization
- Free Tier Usage:
- S3: 5GB storage (free for 12 months)
- CloudFront: 1TB free monthly data transfer
- Route 53: Free for basic DNS queries
- No Unnecessary Services: Avoided EC2/ELB (not needed for static sites)
- Monitoring: Set billing alerts to avoid surprises
- ACM: Free SSL certificates
Scalability
- Global Reach: CloudFront serves content from 300+ edge locations worldwide
- Auto-Scaling: S3 + CloudFront handle traffic spikes effortlessly
- Future-Proof: Can add Lambda@Edge for dynamic content processing
- High Availability: Built-in redundancy across AWS infrastructure
Lessons Learned
- ✅ DNS Propagation requires patience (up to 48 hours)
- ✅ HTTPS is mandatory for modern sites (CloudFront + ACM made it easy)
- ✅ S3 is ideal for static sites (no server management)
- ✅ CloudFront significantly improves global performance
- ✅ Route 53 provides reliable DNS management
Cleanup Instructions
- Delete CloudFront distribution
- Empty and delete S3 bucket
- Remove Route 53 hosted zone
- Delete ACM certificate (if no longer needed)
Conclusion
This project successfully demonstrated:
- AWS static hosting best practices
- Cost-effective architecture (free tier friendly)
- Real-world skills for my cloud career
- End-to-end deployment of a professional website
Next Steps
- Explore adding CI/CD pipeline (e.g., GitHub → S3 auto-deploy)
- Implement website analytics
- Add contact form using AWS Lambda and API Gateway
- Set up monitoring with CloudWatch